8 Apple Notes tips for Mac and iOS you’ll probably use

When you think about it, Notes are also code
I’ve been making lots of use of Notes on my Macs, iPad and iPhone, so I thought I’d share some of the less obvious things I do to get more out of using them, supplementing my Macand iOSguides to using Notes. I hope these come in useful.
Use Siri
I do wonder how many of us remember that we can use Siri to create a new Note? Just tell Siri “Start a new note” and then tell it what you want the note to say.
Make it easier to find Notes
Notes already lets you create a folder-based filing system, but you may still find it a little easier to find specific Notes across all your devices (Mac and iOS) if you take a moment to create a custom thumbnail for the ones you need most often.
The best way to do this is to place an image right at the top of the Note, just before the first line of text which should be the Note name.
That’s easy to do: Open the specific Note and drag-&-drop an appropriate image into that space. After a few moments you’ll find the image appears as a thumbnail across all your logged-in devices. Here’s one I made for a shared Shopping List note.

Sorting options
One more thing: iOS users can sort notes by date created, alphabetically by title, date modified or automatically in Settings>Notes>Sort Notes by, which is a quick way to find some notes.
Export Notes as PDF
Did you know you can export Notes as PDFs? That’s really useful if (say) you’ve taken detailed meeting or lecture notes and want a really easy way to integrate them into your overall document filing system.
It’s easy to do: Open Notes, select the one you want to export and then choose File>Export as PDF… You’ll be asked to name the document and choose a location to place it. The entire Note will be turned into a PDF.
Use Gestures
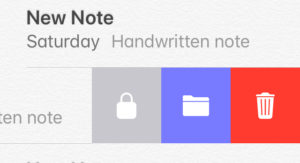
Don’t forget that gestures are supported on both Mac and iOS iterations of Notes. That means if you swipe the note from left to right you’ll be able to Pin your Note a the top of the stack, or swipe from right to left to access the Lock and Delete controls. Easy-peasy.

Lock Notes
Did I mention that you can lock Notes?
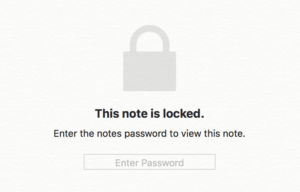
This is a really good step to take, given these notes are shared between devices over the Internet, so if you have information you want to keep safe you may want to lock the Note to keep that data secure. Just select the Note and then either use the gesture, or tap the padlock icon in the tool bar. You’ll be asked to set a password for the Note. You can also unlock these Notes using Touch/Face ID.

Save Safari pages
Use the Share menu in Safari to save a web page in Notes
Learn some Shortcuts
You can format Notes with Titles, headlines, bold fonts and more. You can use the formatting tools in iOS to do this if you want, but (on a Mac) it’s easier to select the text you want to adjust and then use one of these shortcuts:
- Shift+Command+t: Title style
- Shift+Command +h: Headline style
- Shift+Command +b: Body style
- Controls such as Command-bor Command+I will also work as you expect (bold and italics)


ALPHABETIZE NOTES ON MAC 8/28/20: Sort notes by Selecting Notes/Preferences/Sort Notes By: select Title – boom – alphabetized. Can also sort notes by: Date Edited or Date Created.
So, on your Mac, open Notes as usual (using icon that looks like a notepad with a yellow band across the top), select Notes, select Preferences (which is second selection following “About Notes”), select Sort notes by: (which is the very first line item that appears), click the blue up and down box, select the third option “Title”, which is the third selection after Date Edited and Date Created, select the red button to close, and your list of notes will bbllllppp into alphabetical order. Notes will then take a second or two longer to open the next time you go into it, and every time thereafter, but it will be alphabetized.