How to rotate video iPhone movies

Do you hate it when your videos play in the wrong orientation, because you changed the orientation of your iPhone while taking the shot? Has that long, narrow portrait video window on your Mac, Apple TV, or anywhere else you choose to watch them got you down? Here is what to do to rotate video iPhone clips so they look better.
Film them correctly in future
The first thing to remember when filming video on your iPhone is that when you hold it horizontally in landscape mode (sideways) you will end up with clips that look correct on screen, on display, and better when shared on social media. Try it, and you’ll find they play back better without being a tiny sliver of movement in between two ugly black bars.
Another thing to recall is that when you change orientation on your iPhone, the video will seem OK when you play it back, but the changed position will be obvious when you play it on another device. The Golden Rule is to keep using the same orientation while you take a video. For those clips you didn’t film correctly, here’s the fix:
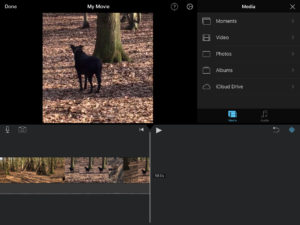
Use iMovie on iOS, iPhone, iPad
You can fix these clips and get them playing nicely in landscape mode using iMovie on your Mac or iOS device. It’s pretty simple:
- Open iMovie and select the clip you want to adjust
- If you need to download the clip, tap it and wait until the download completes
- Tap the Share button and look for Create Movie along the bottom row
- Tap Create Movie and a new project will open up
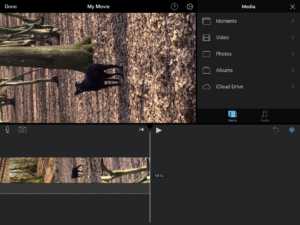
- Rotate the video with two fingers until your clip is in the correct orientation
- Tap Done, tap the Share button, and then tap Save Video in the bottom row.
- Select the size you want and the device will save the clip to your Photos app.

What about sections of clips?
Sometimes you may start filming in one orientation but then change it (from landscape to portrait) mid-process. This looks fine on screen, but when you watch the clip later on you’ll realise that the orientation doesn’t change. You can use iMovie to fix this – just follow the instructions above, but select the portion(s) of the video that need to be changed and change them before saving the clip.
It’s important to remember that changing orientation while filming the movie can cause other continuity problems, so you may want to splice the movie or remove a section of it and make a better viewing ‘flow’ by dropping in a transition.
What about on a Mac?
You’re spoilt for choice if you are using a Mac. Why? Because you can use iMovie or QuickTime to rotate the movie on a Mac.
Use iMovie
- Download and install iMovie on your Mac.
- Import the video you wish to fix.
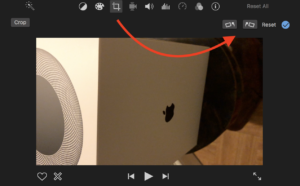
- Click the crop item. Inside the crop window you’ll find rotate left and right items in the right hand top quadrant. (Just above the right top image and the Reset item).

- Rotate the video to the orientation you require and then tap the Share item.
- Choose how you want to share the clip and save it to your Photos library.
Use QuickTime
It’s even easier with QuickTime – just Ctrl-click the video and select Open in Quicktime. The select Edit>Rotate Left (or Right) in the Menu bar.
There’s an app for that
iMovie takes up a lot of space on your iPhone, so if all you really want to do is rotate clips, why not take a look at one of these apps that will do just that (and don’t take up as much space)?
Rotate and Flip Video (free)
This simple app does exactly what it says it does, and no more.
Video Rotate and Flip (99-cents)
This handy app lets you rotate and also crop clips. It also lets you stretch the size and width to fit your preferred viewing window. The app also supports action extensions in iOS, which makes it possible to edit and rotate video clips from within Photos.
Video Rotate (99-cents)
From a different developer and also available as a free app, Video Rotate lets you rotate apps and can also transcode the clip into different versions (small, medium, large) depending on what playback support you need.
Want to do more with iPhone video?
There are a bunch of other simple transitions you can make using iMovie on your iPhone. Take a look here to learn some more.


