How to get a ‘Save As’ command back on your Mac

One of the first customers at Apple’s new Shinjuku store, but I don’t think he is using Save As
Apple’s decision to remove the Save As command from the File menu on Mac apps was probably designed to make using iOS and macOS feel more similar. The idea was that whatever you happened to be working on would automatically save in the background, just like on iOS. That’s fine, but there are times when most Mac users still need the flexibility of Save as, such as when saving items in different available formats.
What’s this about?
Starting around 2011, Apple removed the Save As item as a default choice in the File application Menu bar. That’s why most of the applications you use these days only seem to offer a generic ‘Save’ command. There are exceptions to this – a newly created item will offer Save As so you can save and name the item. There are also apps that still provide Save As by default, such as Word, most Apple apps (however) don’t. That’s fine most of the time, but less fine when it isn’t – and the big secret here is that while the Save Ascommand isn’t immediately obvious, it is in fact still there. Here’s how to access it:
The easiest way to get to Save As
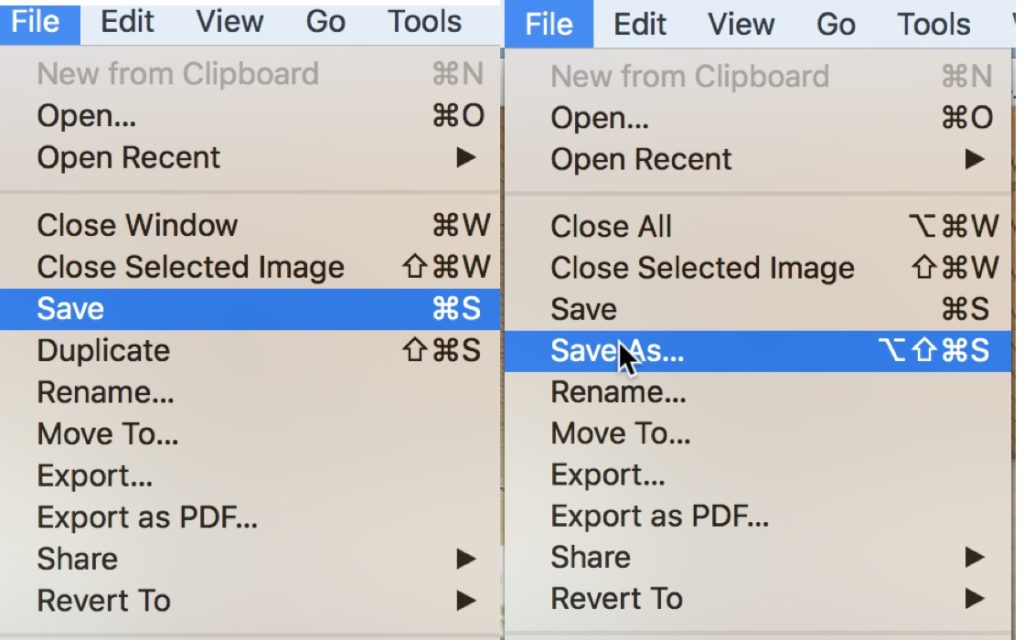
There are in fact three ways to Save As on your Mac. I’ll discuss all of them here, but by far the easiest way to regain this useful function is to tap the Option key as you open the File menu. When you do, you’ll see the Save As command appear, replacing the Duplicate item.

It’s easy as this: Select File. Tap Option. Choose Save As.
The less easy way to get to Save As..
A lot of Mac users were annoyed when Apple removed the Save As command in 2011, so the following year it kind of came back in the form of an annoying keyboard shortcut. This shortcut still works today, when you press it you will open the Save As command for the current document. What is the shortcut? Here it is:
Command-Shift-Option-S
Apple clearly didn’t want to make it an easy shortcut to find.
The least easy way to Save As
You can add a permanent Save As command to your Mac by creating an App Shortcut. It’s actually pretty easy:
- Open System Preferences>Keyboard and choose the Shortcuts tab.
- Choose App Shortcuts in the right-hand list
- Tap the Plus (+) sign

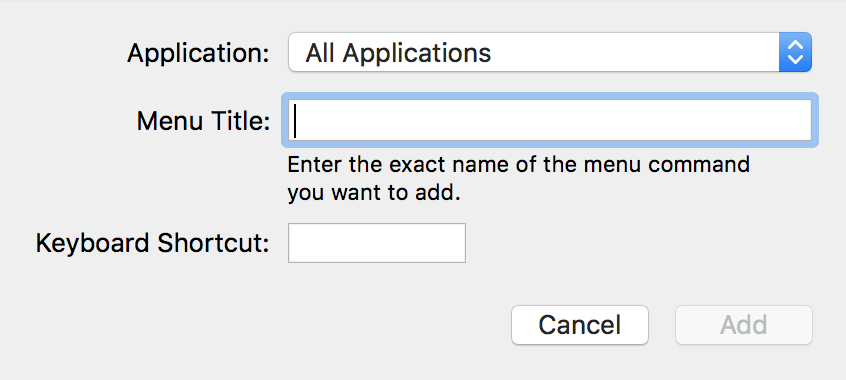
- You’ll see a box appear, check that ‘All Applications’ is selected in the drop down menu on the first line.
- The second line asks for a Menu Title. You should type Save As... You must include the ellipsis.
- The third line asks for a keyboard shortcut, you can choose anything you like but I’d recommend using Command-Shift-Option-S as doing so will avoid confusion later.
- Tap Add to save the new shortcut.
You should now see a new Save As… option appear in the File menu of all compatible applications on your Mac.


