How to get your Apple Watch ready for emergencies

Apple has invested in a range of features that may help you if you face medical or physical emergency, but some of these need to be set up before any emergency takes place to be of any use. So, what should you do to get your Apple Watch ready for trouble?
Setup your Emergency Contacts
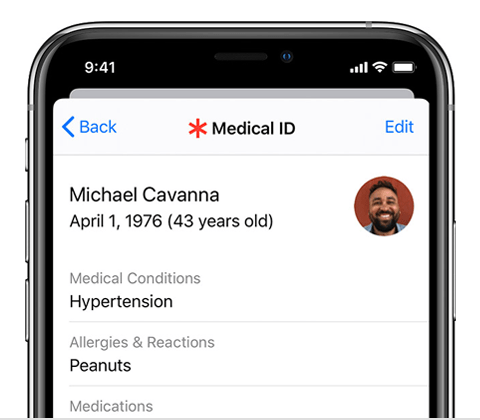
You can set a small number of friends, family members or loved ones to be your emergency contacts in case something happens to you. These people can be added via your Medical ID section on your iPhone’s Watch app or even on the watch itself.
Here is what you need to do on iPhone:
- Open the Watch app on your phone and scroll to Health>Medical ID.
- Tap Edit at the top right
- Scroll down and choose Add Emergency Contact
- Select the contact you want to add and then define your relationship with them.
- Repeat the process until all your relevant contacts are there.
- If you want to delete a contact open the list and tap the minus button.
You can achieve the same directly on your Watch, just open Settings>Health>Medical ID and scroll to Emergency Contacts, and then tap Add Emergency Contact.
If something does happen to you, then you can ask Siri to call your emergency contact.

Put your health details into Medical ID
While you’re in Medical ID you should update the health details held there. If you are in a crisis, emergency services may look at these details to ensure they provide the most appropriate treatment. This can be a life saver, particularly if you have an allergy to commonly used medication or a rare blood type.
Open Health>Medical ID and tap Edit on your iPhone, or Settings>Health>Medical ID on Apple Watch.
In the next screen you’ll be given a chance to enter all your medical details. Tap done when you have entered all the data you intend to.

Share your Medical ID
Once you’ve entered the medical data you think important you need to set it up to be shared. On iPhone open Watch>Health>Medical ID, tap Edit and in the Emergency Access section toggle Show When Locked to be On. What this means is that emergency services will be able to rech this information by pressing and holding the side button and dragging the Medical ID slider to the right. They’’ asp e able to get to this information on an iPhone when they tap Emergency and then tap Medical ID.
Enable Fall Detection
While it can be a little annoying when it chooses to interpret a minor bump as a fall, it’s reassuring to know that if you do have a fall your Apple Watch will recognize that you have done so and try to get you some help.
This useful feature will alert appointed contacts and emergency services in the event you take a hard fall and the watch doesn’t detect movement for a while. To enable it, go to the Watch app on your iPhone, open Emergency SOS and then toggle Fall Detection to on.
If your device thinks you have had a fall it will beep and you’ll have a few seconds to cancel any alerts being sent.
[Also read: 42+ useful and sometimes obscure Apple Watch tips you’ll use]
Check your ECG
Apple Watch 4 and later has a built-in ECG reader. To use it:
- Open Health on your iPhone to set the feature up.
- Then open the ECG app on your Watch, place your arm on a steady surface, and place the tip of your opposite index finger gently on the Digital Crown.
- You’ll see a graphic of your heart rate and must keep your finger there for 30-seconds.
If you get told there’s a Sinus rhythm then you are OK. If you get warned of an atrial fibrillation then repeat the test and get to the doctor.
More health features are on the way
Australian health insurer AIA says people using an Apple Watch move as much as 51% more than they did before, unlocking real health benefits. watchOS9 will bring more customizable watch faces, an enhanced Workout app, new sleep management tools and a built-in medication tracker, Apple said at WWDC 22.
Please follow me on Twitter, or join me in the AppleHolic’s bar & grill and Apple Discussions groups on MeWe.


