How to setup and use Dual SIM on your iPhone

Welcome to 2022. A New Year, some new speculation. The first being whispers that Apple may be preparing to move to an all e-SIM setup with iPhone 14, the second being a serendipitous support video explaining how to setup and use Dual SIM on iPhones.
What is Dual SIM?
Most current iPhones rely on a physical SIM card.
Many also support a dual-SIM setup consisting of both a physical SIM card and an eSIM, a virtual card provided by some carriers. This was first introduced with iPhone XS, XS Max and iPhone XR. The iPhone 13 is the first iPhone to support dual eSIM’s.
It seems Apple wants to remove the SIM tray altogether, which will require a move to adopt eSIM. Current speculation suggests it will introduce SIM-tray-free iPhones in September 2022.
This will also remove yet another port as the company continues a mission to make iPhones completely sealed units.
[Also read: Will UWB be Apple’s fix for better AirPods music streaming?]
Given the iPhone 13 already supports dual eSIM’s it’s clear that users can expect to use up to two numbers with these devices, though not every carrier yet supports eSIM on iPhones.
How to set up Dual SIM on your iPhone
Apple Support has published a video explaining how to set up and use Dual SIM on those iPhones that support it.
To use the feature, you must obtain an eSIM from a carrier. Not every carrier supports this, so do review this list hosted on Apple’s website to see if your carrier will support dual SIM.
On a locked iPhone you are required to get your second eSIM from your contracted carrier, but you can use any supported eSIM on an unlocked iPhone.
https://youtu.be/4dVJulsiTiw
1. Use a QR code:
Some carriers provide printed QR codes. Open Settings>Cellular, tap Add Cellular Plan and scan your QR code with your iPhone to activate your eSIM.
2. Use a carrier app:
Some carriers offer eSIM set up via their own app – download their most recent app from the App Store and see if it is available there. You may be provided with a Notification link to use during setup.
Install Cellular Plan
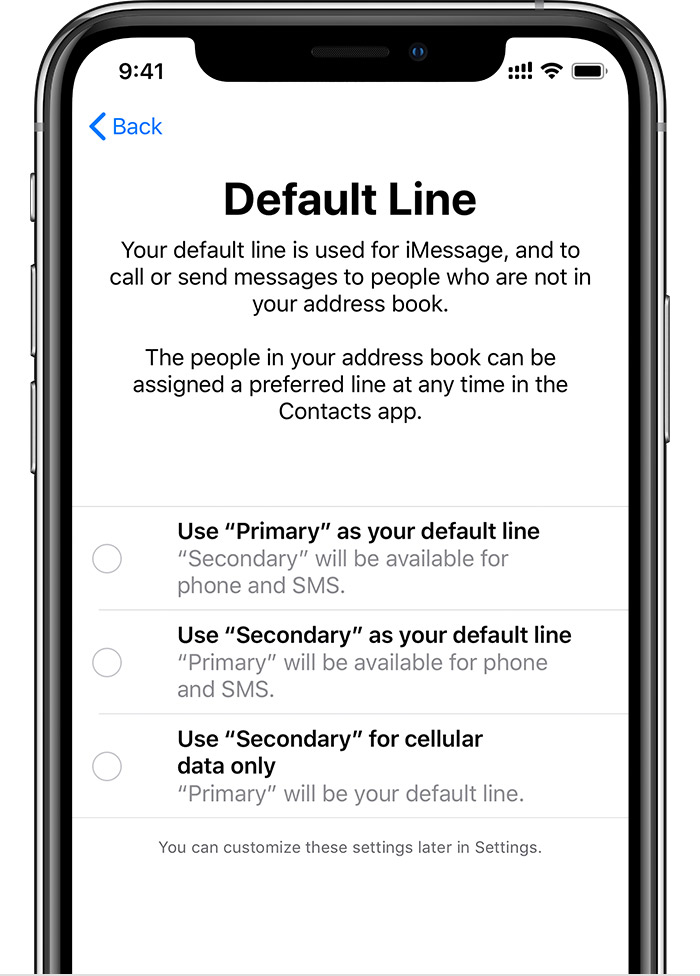
Label your phone lines as business, personal, or travel, and create a custom name. You may use one line for travel and another for personal, for example. Tap finish and then choose a Default Line, which will be used to make calls and send messages.
The setup process will also ask you to select which line to use with iMessage and FaceTime. You must also choose which line to use for data and which one to use for calls. Enable Cellular Data switching at the bottom of this dialog for more flexibility,
Each line you create on your device can be defined as follows:
- Use Primary as default
- Use Secondary as default
- Use Secondary for cellular data only.

Define your default and secondary lines
How to use dual-SIM
One of the first things you’ll see once you’ve enabled a second line is a subtle change in the top right corner of your Home screen.

The mobile signal bar indicator now appears a little different.
Look closely and you’ll see it has been divided into two, with the top set of indicators showing the signal strength of your Primary line while the bottom set shows the strength of your secondary line.
Another thing you may want to do is assign preferred lines to people in your contacts book.That way you’ll always use your business line to contact business contacts, giving your personal line a little additional privacy.
By default, the system will always call a contact using the last line you used, but you can also tap the option next to default at the top of the contact record to choose the line you wish to use when you contact them.
When placing a call you can change the line you are using by tapping the grey bar at the top of the device in the dialling display to choose the appropriate one. Please explore my growing collection of hints and tips for your Apple products.
Please follow me on Twitter, or join me in the AppleHolic’s bar & grill and Apple Discussions groups on MeWe.


