How to Use Tags in macOS and iOS

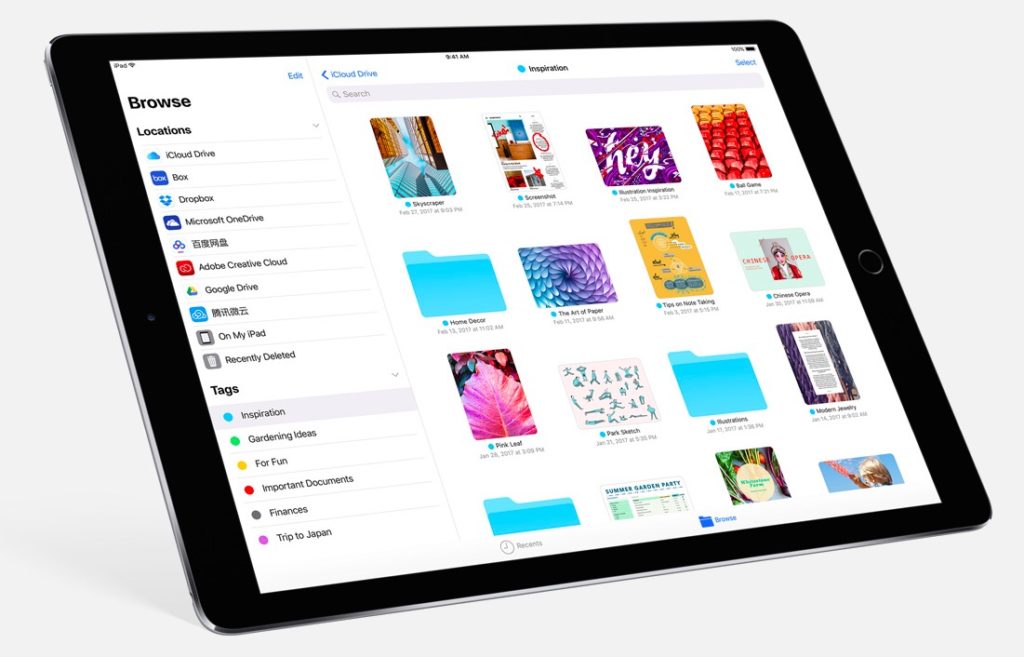
Apple’s new Files app and the existing iCloud integration of Documents across both Macs and iOS devices mean most of us will need to begin making much more extensive use of tags when saving and managing files.
Apple’s new Files app and the existing iCloud integration of Documents across both Macs and iOS devices mean most of us will need to begin making much more extensive use of tags when saving and managing files.
Let’s get started
I thought it might be useful to put together a little information about how to use tags across both systems. I doubt I’ll be able to cover everything on this topic, but I plan to update the article frequently and hope that readers will contribute what they know in the comments field below.
iOS 11 and the Files app
Apple lived up to expectation and introduced a real file system for iPads, iPhones and other iOS 11 devices. It’s called Files, integrates with iCloud and other online storage systems, has a bunch of APIs developers can use to integrate their apps with the system, and lets you work on files from your Mac using apps on your iOS devices. It’s particularly powerful when used with an iPad. The idea is that anything you save on any system will be made available across all your systems, enabling you to work anywhere, on iPhone, iPad, Mac or other device.
Once you have tagged items it becomes much easier to find, manage and search for them across all your systems. You can assign projects to one set of tags (in progress, complete, pending, for example). You could assign another tag for domestic information, perhaps have a tag you use for things you are collecting for your novel. Tags can be applied to almost any file on your systems.
 Using tags on iOS 11
So, how do we use tags? Typically, there will be two types of file you work on within the Files app: Existing and new items
When you are working with new items the options for tagging are much more limited. I haven’t yet figured out how to tag a new Note or an image from inside Photos.
That’s a shame, but perhaps this will change as the Apple refines the system (I would like to be able to tag Notes as I could then use these to capture quick ideas, if it is possible to tag Notes then please let me know).
You can tag items made in Pages, Numbers, Keynote and other apps that support the Files app, but you seem to need to tag them from within the Files app once they are saved there. The procedure for tagging them is then the same as the method used to tag existing documents you can access in Files.
Adding tags within Files
To add tags to an existing item you must select it in the Files app and tap the Share icon.
- You’ll find all the usual options but the one you want to use sits at the top of the Share page, to the right of the file name: +Tag.
- Tap +Tag and you’ll be taken to a new page that lists all your available tags (Red, Orange, Yellow, etc). You can add the item to one of these, or tap Add New Tag to create a new tag item.
- The tag that applies to the new item will be ticked on the list. You can place multiple tags on each item (each denoted by a tick in this section). Press Done once you’ve tagged the item.
Once an item is tagged you’ll find it in your Files app when you tap the relevant tag – so if you tag an item with the red tag you’ll find it in the selection of red-tagged items in Files.
Edit and remove tags in Files on iOS 11
You can edit tags in Files on iOS 11. In the Files Browse menu tap Edit in the top right corner. In this section, you can add or remove Locations, Favorites, and Tags. To remove a tag just tap the red minus sign to the left of the name.
Don’t forget — changes made to your tags on iOS 11 will be replicated across all your systems, including your Macs.
Rename tags
You can also rename tags here: You may want to use the red tag for anything to do with Portugal, for example. In Edit mode, tap the name of the tag (Red) until the icon appears, now delete the existing name and type in the one you want to use (Portugal).
Reposition tags
You can also reposition items in the Tags list in Files Edit view. To do this all you need to do is tap and hold the three-line (burger) icon to the right of the Tag in the list, then move it to the desired position in that list. This will then be updated across all your systems, though you must wait a short time for proliferation to take place.
 What about the Mac?
You can also use tags on your Mac. In Finder view you can control-click on any selected item to assign it to a tag, or use the Gears icon to do the same thing. You can also easily assign a tag or tags to items as you save them.
When in applications that support Apple’s Document menu (such as Pages or TextEdit), you can also assign a tag to something when it is open by tapping its name at the top to open the Name and Tags items.
Finally, you can also assign a tag to one or more items by dragging its icon to the relevant tag in the Finder sidebar.
Managing tags
To edit the names of your tags just open a Finder window and Control-Click the tab. You’ll be able to rename it, remove it from the sidebar, and delete it.
- You can set a bunch of other properties to tags in Finder Preferences. When in the Finder tap Finder> Preferences in the menu bar and select Tags. You’ll see all your tags listed there.
- Select one and hit the minus button to delete it, or tap the Plus button to create a new tag.
- To change the color of a tag just hover your cursor over the color in the list and click to assign it a new one.
- To change the name of a tag just Control-click the tag and select Rename Tag.
- You can also select which tags will appear in the sidebar by setting the right-hand blue box with a tick.
Using tags
Once you have assigned tags to a few things you can search for them by tag in Finder. To search for tagged items in the Finder’s Search bar just begin typing the tag color or name – you should eventually see the tag pop up in the contextual menu that appears while you type. Tap it to select and search for items saved using it.
You can also find all items that have been assigned to a tag using the Finder sidebar. Tap the tag to see those items saved there. You can select an item and press the Spacebar to see a quick view of that item.
There are a range of ways you can use tags to change viewing options on your Mac: If you click the arrangement button (it’s just beside the gears icon in a Finder window) you can choose to sort items by tag. In View>Show View Options you can also check Tags.
 Why tags matter
What’s important about making effective use of tags is that you assign tags to everything you do and that you spend a little time figuring out an effective system to use when tagging files. You can assign multiple tags to files – that’s effective, as it means that as well as your standard Folder and item name views, you can also now find items through tags.
In future as you save items on any of your systems you must only remember to assign the relevant tag to that item and it will almost immediately be found in that tag on all your Macs, iPhones, iPads etc. Which is useful and cool.
The advantage of this approach is that it doesn’t matter which folders relevant items are stored in as you’ve now told all your systems that those items also relate to a tag, which provides another easy way to find what you need, when you need it, on any of your Apple systems. So long as you are logged in using the same Apple ID.
 Using tags on iOS 11
 What about the Mac?
 Why tags matter


