Mac users: Do you know this three finger drag trackpad tip?

Fly across your Mac’s content with three finger drag!
When you want to shift things around in the Finder, on the desktop, or even within something you are working on it’s likely you click and drag the item, right? That’s fine, most of the time, but if you suffer from carpal tunnel syndrome or another repetitive strain injury (RSI) the action of clicking can be uncomfortable, or even painful. That’s why I use this little-known Accessibility feature, it’s called Three-Finger Drag.
Contents: What you will learn
Which Macs support Force Touch trackpads?
How do I enable three finger drag on my Mac?
How do I use three finger drag?
What is three finger drag?
Apple has designed three finger drag to promote accessibility, primarily for those who do endure RSI-like problems, including myself.
The gesture lets you use three fingers to select and drag any item using the Force Touch trackpad on your Mac.
When enabled all you need to do is hover your cursor above a page header, Finder item, or object inside a document, gently place three-fingers on the trackpad to select that item, and you can then drag it around, no pressure required.
Which Macs support Force Touch trackpads?
Apple began introducing Force Touch across its products in 2014. Now you’ll find it in MacBooks equipped with Retina displays from 2018 and on, and MacBook Pro models from early 2015 and later, including the fabulous M-series Macs.
You can also make use of this feature if you use a desktop Mac with Apple’s Magic Trackpad 2 (affiliate link) and later for non-mobile Macs.
Force Touch trackpads provide precise cursor control and pressure‑sensing capabilities; support pressure‑sensitive drawing and also give you a range of Multi‑Touch gestures. There are lots of ways you can make use of these. This article provides an easy to read starting point to some of these other useful features.
Now back to three finger drag.

Fun with three fingers! (Photo by Sincerely Media on Unsplash)
How do I enable three finger drag on my Mac?
It’s super-easy to enable three finger drag:
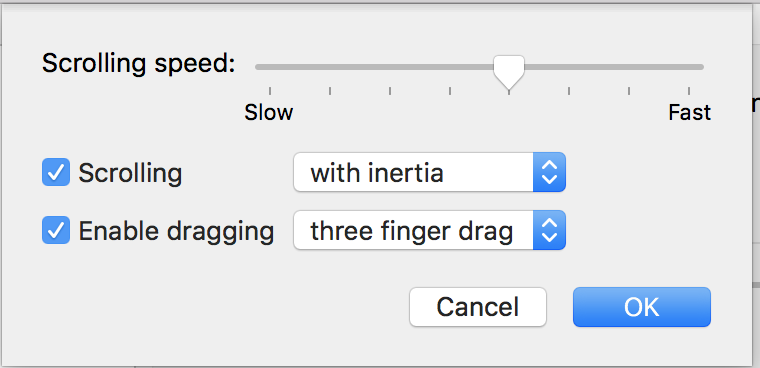
- Open Mac System Preferences>Accessibility>Mouse & Trackpad and click Trackpad Options…
- In the next box, you should check Enable draggingand select three finger drag from the drop-down.
- Click OK and you’re done.
How do I use three finger drag?
Now you’ve enabled the feature, try these:
On the Desktop:
Hover your cursor above an item on your desktop, gently place three fingers on the trackpad, and you will be able to move the item by moving those three fingers on the trackpad.
Rearrange things:
You can use this to rearrange items in folders, documents or anywhere else. Be warned, you must make sure you first place your trackpad in empty space above or beneath any list items if you want to navigate through a list without selecting something.
In Finder view:
Hover as above, place three fingers on the trackpad and you can drag and drop item between folders, drives or anything else in Finder view.
In an application:
In Word, place your cursor somewhere in the text, place your three fingers and you can select words, paragraphs, lists, move text around – basically everything you could do using drag-&-drop. This is very useful when working in graphics applications.
Use it in the Toolbar:
Hover above an item, place three fingers on the trackpad, and you’ll find you can rearrange the object’s position in the menu, or in the Dock, or a Safari Bookmarks list, or anywhere else you’d usually use drag-&-drop.
Move windows:
You can now use three fingers to move things around.
Resize windows:
Hover, place and use three fingers in the corner or to the side of a window to resize lists, windows and other items.
The gesture will work in every application across your Mac.
It may take some getting used to, but once you do it will become as intuitive as the old way of working.
One more thing: You may find you run out of trackpad space when moving items on your Mac, but check this: Once you select an item and begin to drag it, you will be able to flick an item to its destination by lifting two fingers from the trackpad and flicking it in that direction using the third. Try it now!
What about Exposé?
If you use Exposé you will no longer be able to see all the open windows belonging to the current application by moving three fingers down the trackpad. Don’t worry – just use four fingers instead – check the Trackpad preferences and you’ll see it has automatically been updated to be compatible with three finger drag.
You can also navigate between spaces with four fingers, though Control and the right or left arrow key also work.
I find three finger drag invaluable. It really helps reduce the impact of RSI when I use my Mac. You don’t need to suffer from RSI to use it — I’d urge everyone to try it to reduce the chance of developing the problem. I do hope you find this feature useful.
Where to find more Apple tips
Are you searching for more tips? Please explore my extensive and growing collection of them.
Please follow me on Twitter, or join me in the AppleHolic’s bar & grill and Apple Discussions groups on MeWe.


